The short answer
A basic Meta pixel installation is usually free if you use your store platform’s official integration, and takes under an hour. The real cost is in doing tracking properly: adding the Conversions API, deduplicating events, mapping the right events with correct values, improving event match quality and testing everything. That work ranges from a few hours for a standard Shopify store to several days for custom sites or complex lead funnels, plus ongoing server costs if you use server-side tagging. Paying for it is worth it once your Meta spend is meaningful, because every optimization Meta makes depends on this data.
“How much does Meta pixel setup cost?” sounds like it should have a simple answer. Often, it gets one: “It’s free, just install the app.” That answer is technically true and practically misleading. Installing the pixel is the easy part. Making sure Meta receives complete, accurate and deduplicated conversion data, the part that actually affects ad performance, takes more work.
We set up and audit Meta tracking for ecommerce stores, lead generation businesses and apps. In almost every audit, we find at least one problem: purchases counted twice, events firing on the wrong page, values missing, or the Conversions API not running at all. Each of those problems costs money every day the ads run, because Meta optimizes towards whatever data it receives.
This guide explains what a proper setup includes, what each part costs in time and money, when doing it yourself is fine and when professional setup pays for itself.
What “Meta pixel setup” actually includes
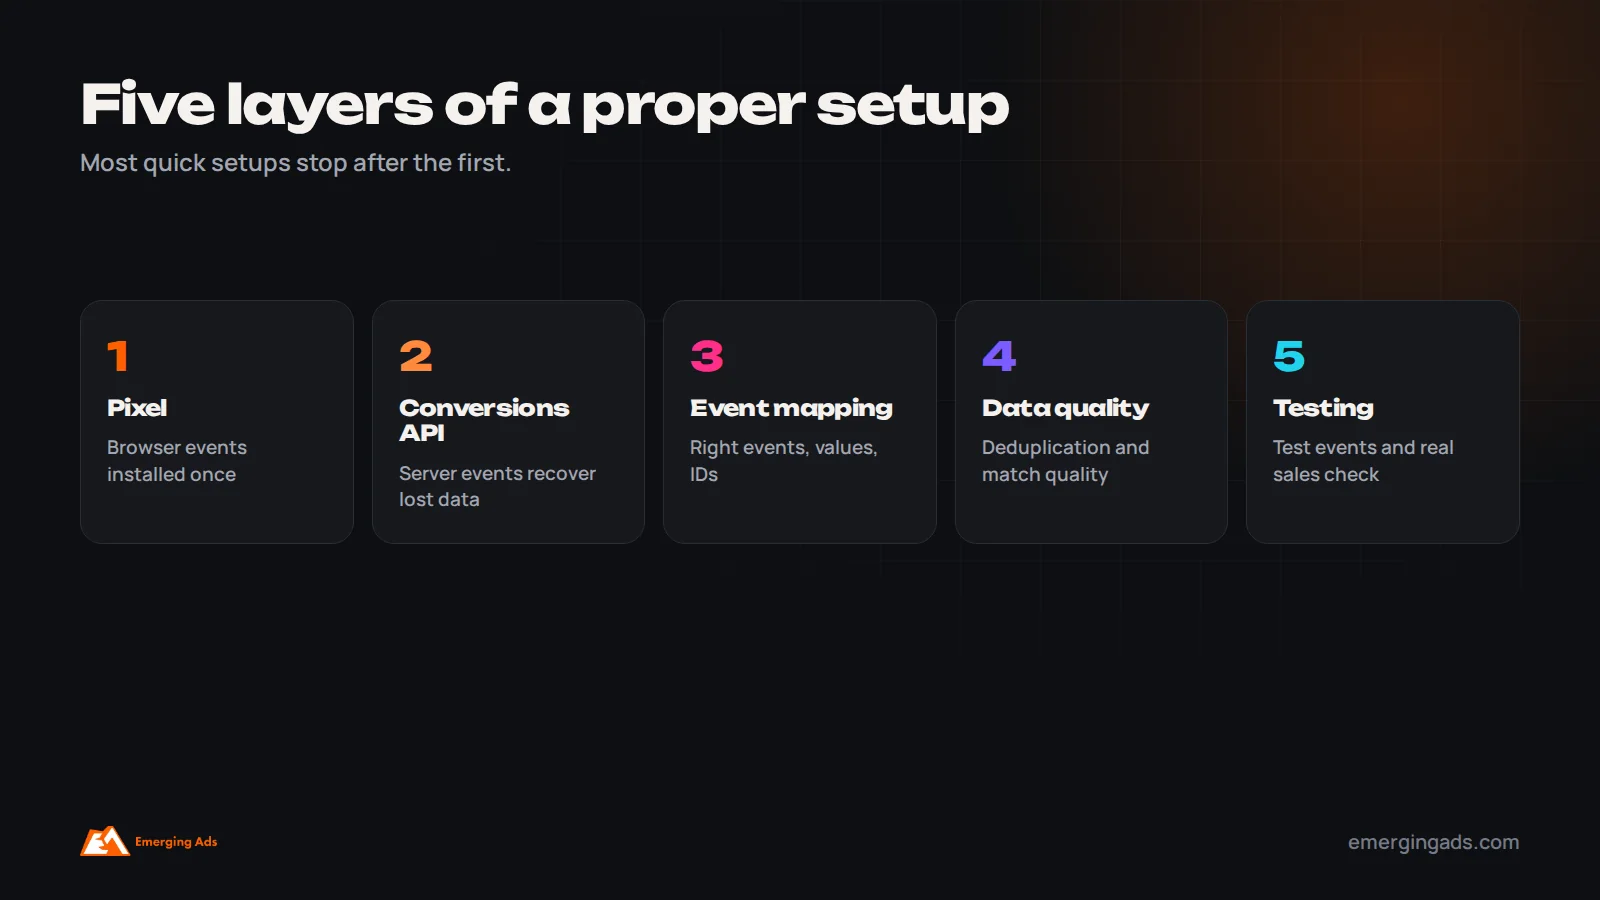
The phrase covers a range of work, from a five-minute plugin install to a full server-side tracking build. A complete setup has five layers:
- Pixel installation: the browser-based code that records events such as page views, add to cart and purchase.
- Conversions API: a server-to-server connection that sends the same events from your website or platform directly to Meta, recovering events the browser misses.
- Event mapping: deciding which actions to track, as standard or custom events, with the right parameters such as value, currency and content IDs.
- Data quality: deduplication between pixel and Conversions API, event match quality improvements, domain verification and aggregated event measurement settings where relevant.
- Testing and monitoring: verifying everything fires correctly, comparing results with real sales, and keeping an eye on it after launch.
A cheap quote usually covers the first layer. A proper setup covers all five.
Why tracking quality affects your ad costs
Meta’s advertising system learns who to show ads to from the conversion events you send. If 30% of purchases are missing, Meta learns from an incomplete picture of who your buyers are. If purchases are counted twice, it thinks campaigns perform better than they do, and budget decisions follow. If lead events fire on page load, it finds people who load pages, not people who become customers.
That is why tracking is the first thing we check in any Meta account, and the first item in our guide to common Facebook ads mistakes. Spending on ads before tracking is right is like paying a driver who cannot see the road.
Step 1: Basic pixel installation (usually free)
For most platforms, installing the pixel costs nothing beyond time.
- Shopify: the official Facebook and Instagram sales channel app connects the pixel, catalog and Conversions API with a few clicks.
- WooCommerce: Meta’s official plugin, or well-maintained alternatives, installs the pixel and can send server events.
- Other ecommerce platforms: BigCommerce, Wix, Squarespace and others have built-in or partner integrations.
- Custom websites: the pixel code can be added directly or through Google Tag Manager.
Time required: under an hour for a standard platform, a few hours for a custom site with Tag Manager. The cost at this stage is mostly the risk of doing it wrong, such as installing it twice through a theme and an app.
Step 2: Setting up the Conversions API (where real cost enters)
The Conversions API sends events from your server rather than the visitor’s browser. Ad blockers, browser privacy features and Apple’s App Tracking Transparency all reduce what the pixel can see, so the Conversions API recovers a meaningful share of conversions that would otherwise be lost.
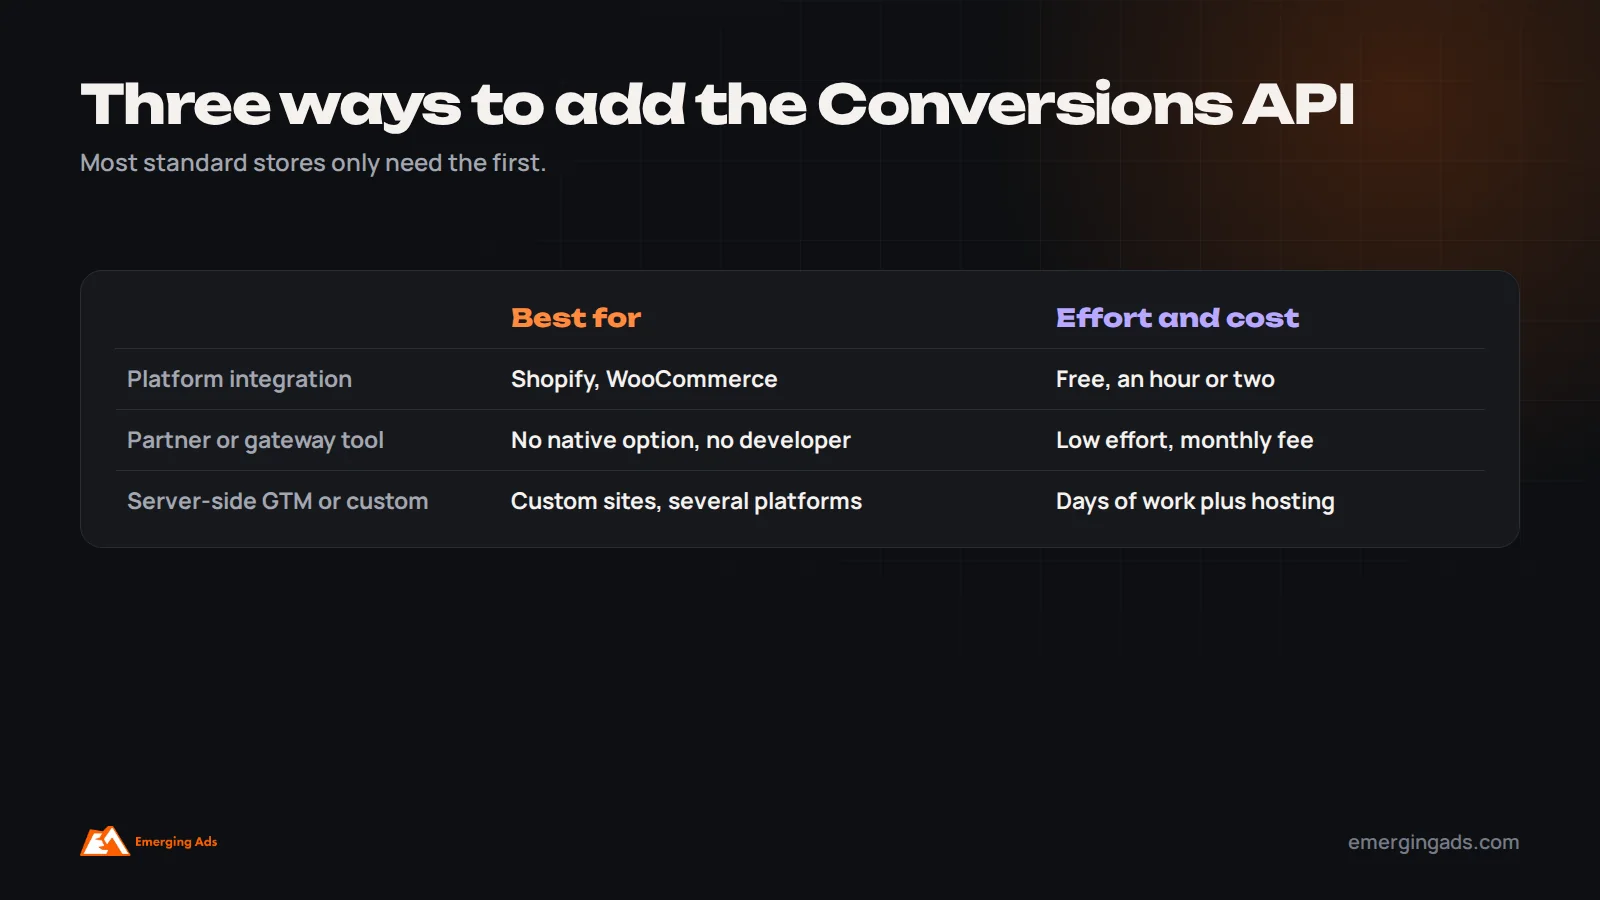
There are three common ways to set it up, with very different costs:
| Method | Best for | Time and cost |
|---|---|---|
| Platform integration (Shopify, WooCommerce plugin) | Standard ecommerce stores | Free, an hour or two to configure and test |
| Partner integrations and gateway tools | Sites without a native integration, or no developer | Low setup effort, often a monthly fee or hosting cost |
| Server-side Google Tag Manager or custom build | Custom sites, complex funnels, several ad platforms | Several days of specialist work, plus ongoing server hosting |
For most Shopify and WooCommerce stores, the native integration is enough. Server-side tagging becomes worthwhile when you send data to several platforms, need more control over what leaves your site, or run a custom checkout.
Step 3: Mapping events to your actual business goals
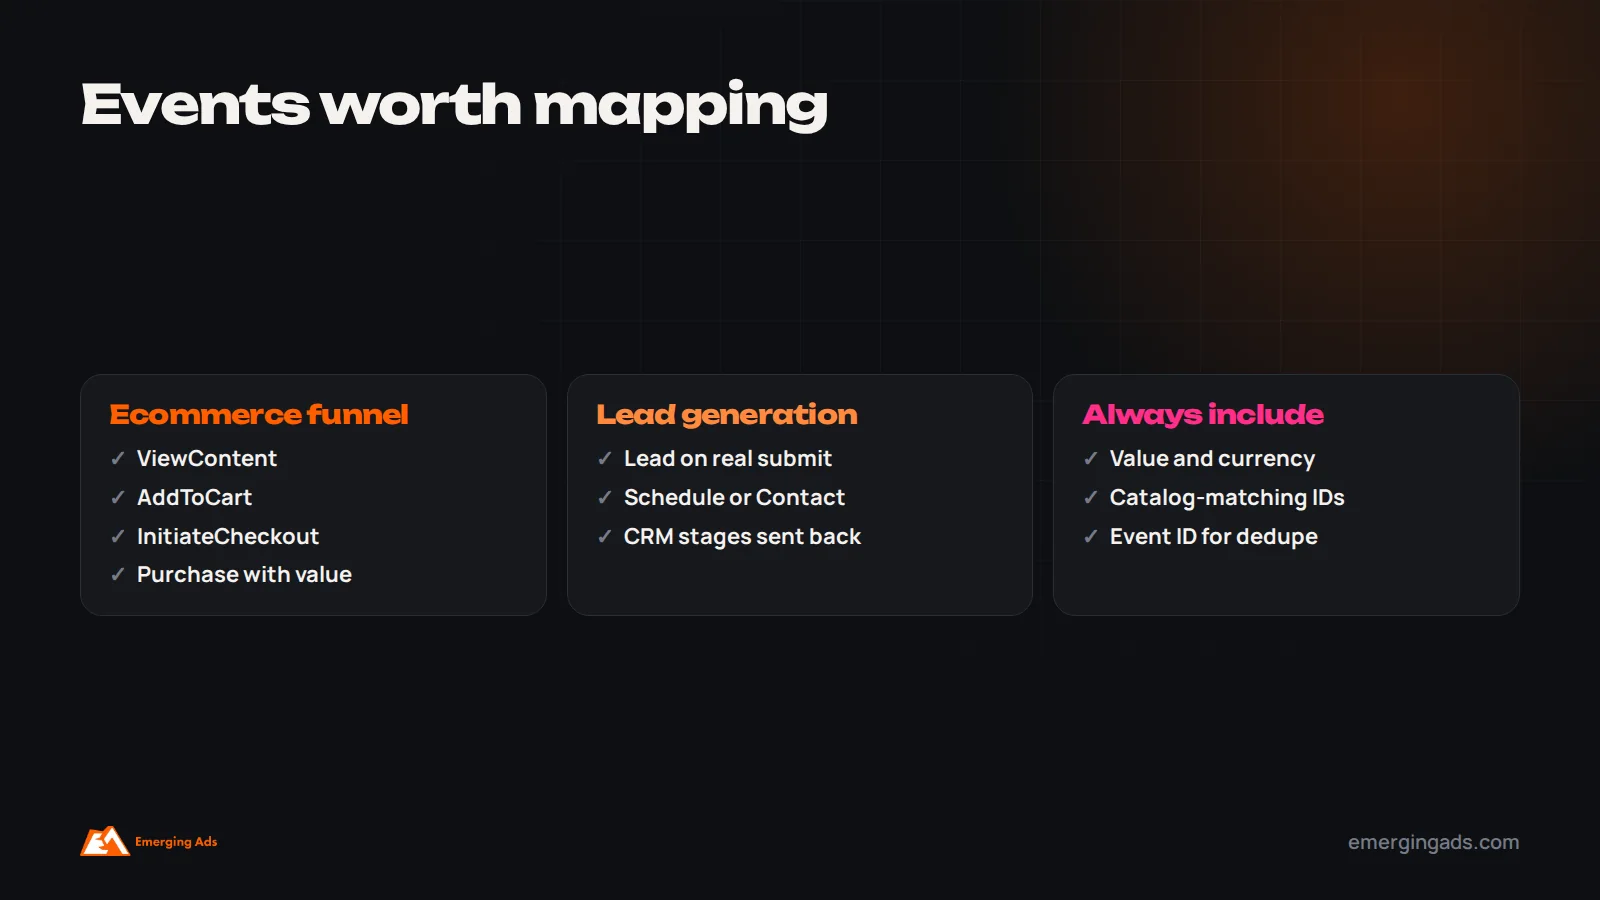
Meta has standard events for common actions: ViewContent, AddToCart, InitiateCheckout, AddPaymentInfo, Purchase, Lead, CompleteRegistration, Schedule, Contact and others. Using standard event names helps Meta understand and optimize for them.
Mapping decides which events you send, from which pages or actions, and with what details. For an online store, that means the full shopping funnel with value, currency and product IDs that match your catalog. For a lead generation business, it means firing Lead only on genuine submissions, not page loads, and ideally sending later stages such as qualified lead or booked appointment back from your CRM.
Custom events and custom conversions fill gaps, such as tracking a specific high-value form separately. Keep the list focused: tracking 30 events nobody uses adds complexity without adding value.
Time required: an hour or two for a standard store, a day or more for a multi-step lead funnel with CRM integration.
Step 4: Data quality, deduplication and match quality
When both the pixel and the Conversions API send the same purchase, Meta needs to know it is one purchase, not two. Deduplication uses an event ID that matches across both sources. If it is missing, purchases can be double counted, which inflates reported results and confuses optimization.
Event match quality is Meta’s score for how well your events can be matched to Meta users, based on the customer information sent with them, such as hashed email, phone number, name, location and browser identifiers. Higher match quality means more of your conversions are attributed and used for optimization. Improving it usually means sending more customer details from your server, with appropriate consent.
Domain verification in Business Manager confirms you own your website, which matters for some configuration options and for protecting your domain from misuse.
Time required: an hour or two for platform integrations, more for custom setups.
Catalog matching and dynamic ads
For ecommerce, tracking and the product catalog are linked. Dynamic ads, which show shoppers the exact products they viewed or added to cart, only work if the product IDs sent with ViewContent, AddToCart and Purchase events match the IDs in your Meta catalog exactly. A mismatch, such as events sending variant IDs while the catalog uses parent product IDs, means dynamic retargeting quietly shows the wrong products or nothing at all.
Check the catalog’s event source diagnostics in Commerce Manager, which reports the share of events that match catalog items. A low match rate is one of the easiest problems to miss and one of the most valuable to fix, because dynamic retargeting is often among the most efficient campaigns in an ecommerce account.
Step 5: Testing everything before you trust it
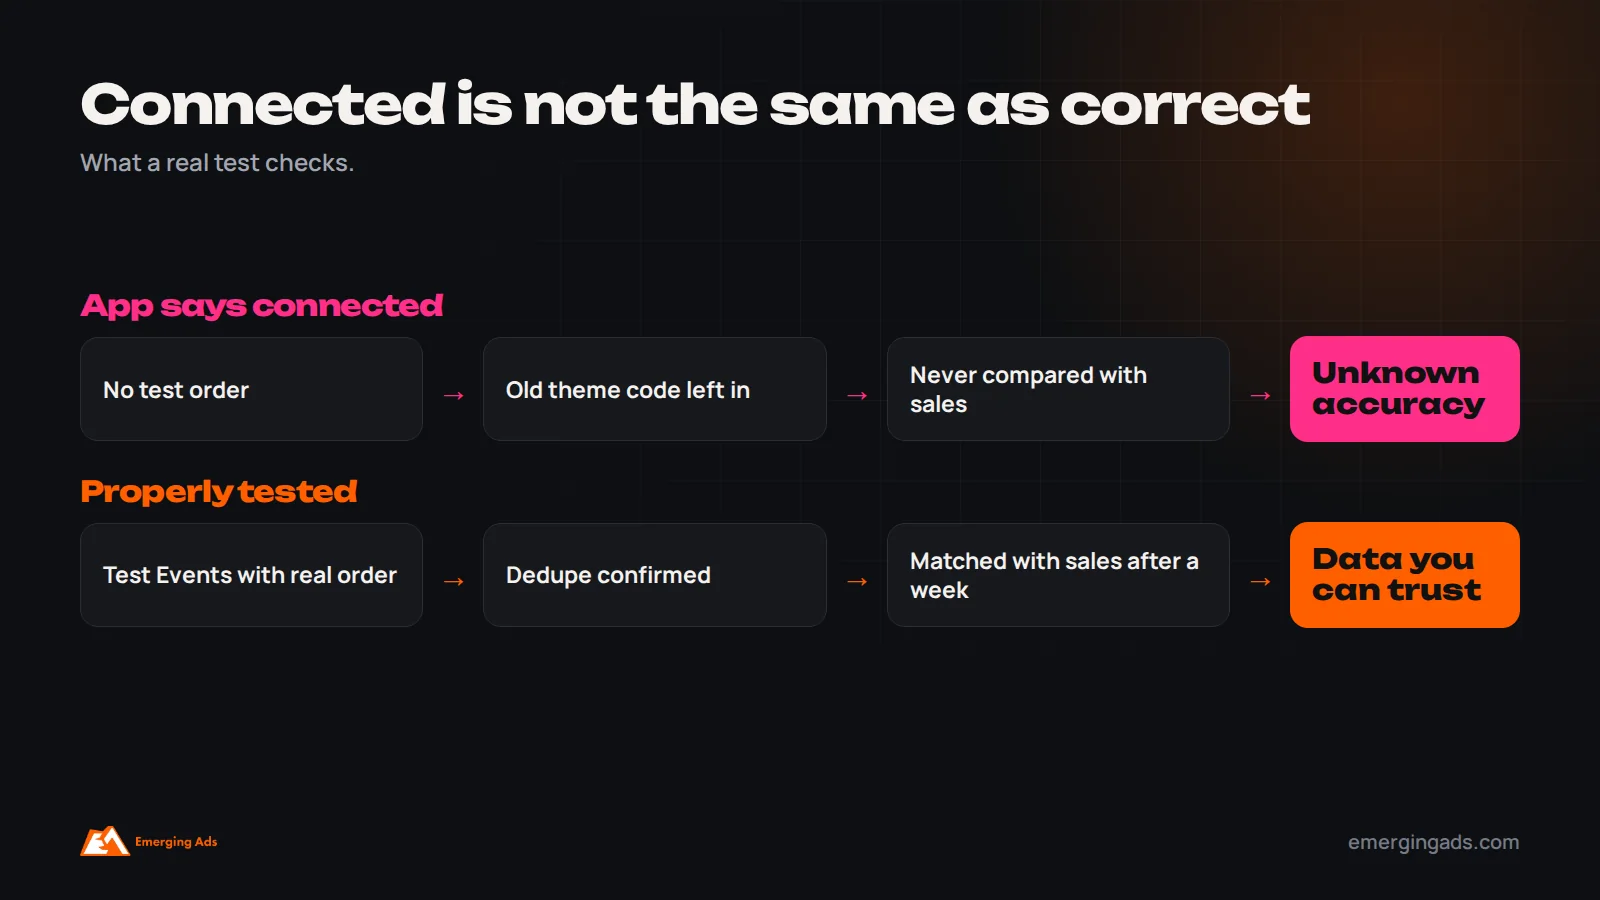
Never assume tracking works because an app says it is connected. Use the Test Events tool in Events Manager while you browse the site, add to cart and complete a real or test purchase or form submission. Check that each event appears once from each source, with the right values, and that deduplication shows as working.
Then wait a week and compare Meta-reported purchases or leads with your actual store or CRM numbers. They will not match exactly, because of attribution windows and privacy limits, but a large unexplained gap, or more Meta purchases than real orders, means something is wrong.
Time required: one to three hours for testing, plus a check after a week of live data.
Keep a short record of what you tested and what you found, including screenshots of Test Events. When something changes later, you will have a known-good baseline to compare against, which makes diagnosing problems much faster.
How setup differs by platform
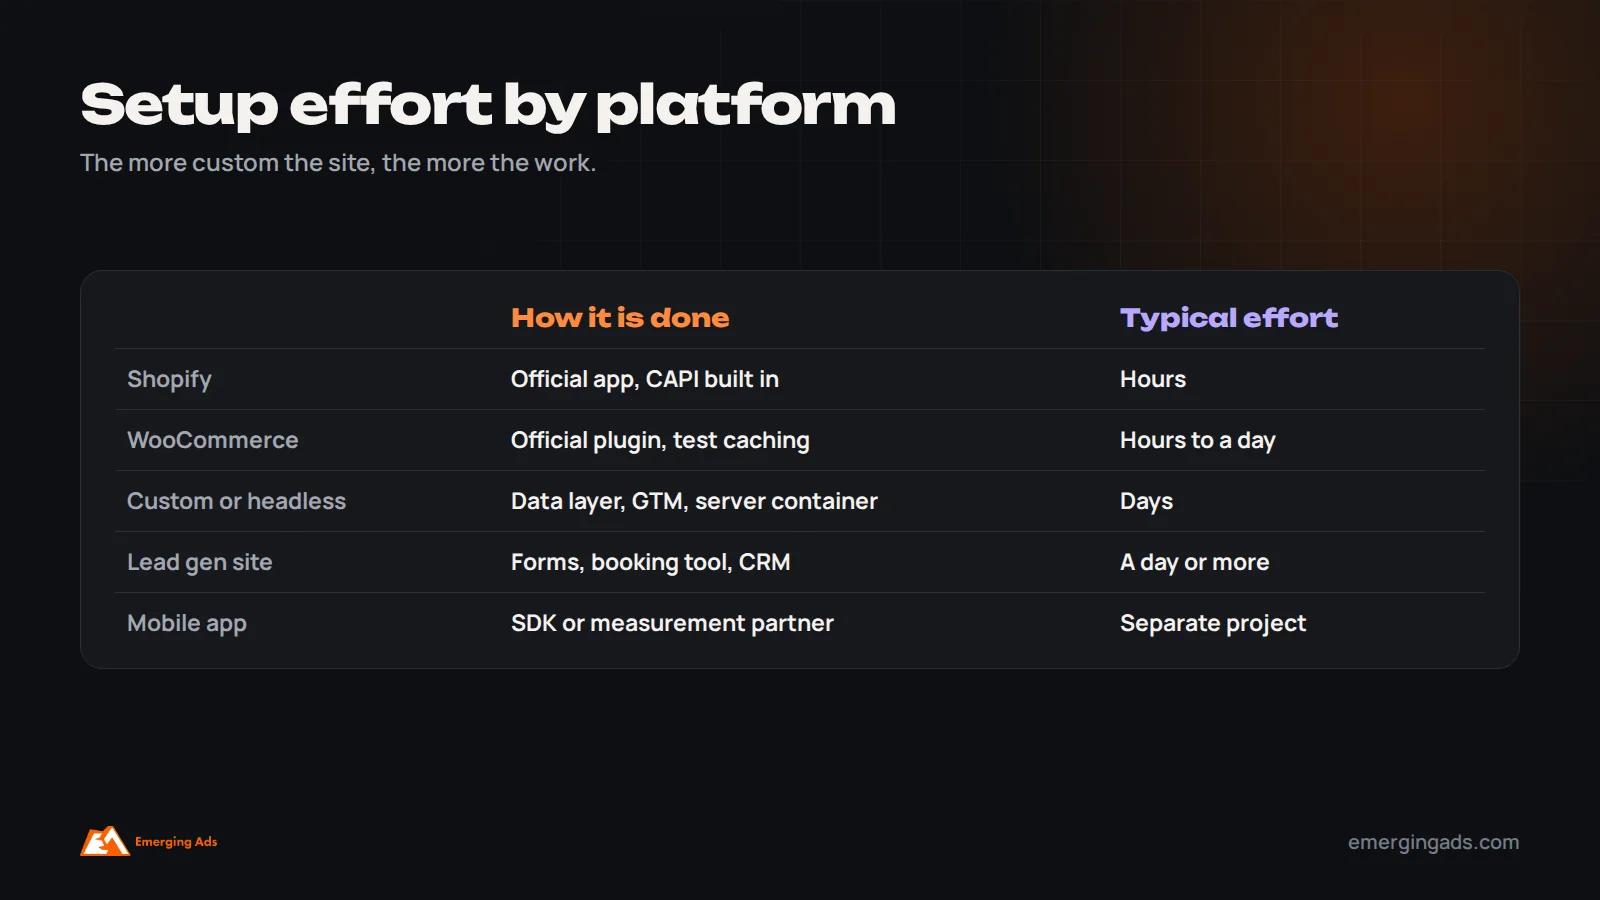
Shopify. The official Facebook and Instagram app handles the pixel, Conversions API, catalog sync and purchase events, and works with Shopify’s checkout. The main jobs are choosing the maximum data sharing setting, removing any old pixel code from the theme or other apps, and testing. Because Shopify’s checkout extensibility changes moved tracking away from old checkout scripts, older manual setups often stop working on upgraded stores and need replacing.
WooCommerce. Meta’s official plugin, or a reputable alternative, can send both browser and server events. Plugin conflicts are common, especially with caching, so test carefully after setup and after updates. Caching plugins sometimes serve cached pages that interfere with event firing.
Custom websites and headless stores. There is no plugin to rely on. Events need to be pushed into a data layer by developers, sent through Google Tag Manager, and the Conversions API built through a server-side container or a direct integration. This is where setup takes days rather than hours.
Lead generation sites. Form tools, booking systems and CRMs each need to fire the right event at the right moment, and often send data back later. A typical setup connects the website form, any third-party booking tool, Meta’s instant forms and the CRM.
Mobile apps. Apps use Meta’s SDK or a mobile measurement partner rather than the pixel, with their own setup and privacy considerations under Apple’s App Tracking Transparency.
What Apple’s privacy changes mean for setup
Since Apple introduced App Tracking Transparency in 2021, many iPhone users opt out of tracking across apps, which reduced what Meta can see from the browser pixel. Meta responded with modeled conversions, which estimate some conversions it cannot observe directly, and by encouraging the Conversions API and better event match quality.
In practice, this means two things for your setup. First, server-side events and good customer information matter more than they used to, because they help Meta match conversions that browser tracking misses. Second, Meta’s reported numbers include an element of modeling, which is another reason to compare them regularly with your real sales rather than treating them as exact counts.
DIY cost breakdown for a standard Shopify store
For a typical Shopify store using the official integration, a careful owner can do a solid setup themselves:
- Software cost: nothing, using the official app.
- Time: around three to six hours in total for installation, Conversions API settings, removing old duplicate code, testing and checking results after a week.
- Risk: moderate. The most common DIY mistakes are leaving old pixel code in the theme alongside the app, not checking deduplication and never comparing results with real sales.
Before starting, check the theme code and installed apps for any old Meta pixel snippets, which are a very common source of duplicate events. Removing them is often the single most valuable step in a DIY setup, and it takes only a few minutes once you know where to look.
If you are comfortable in Shopify admin and follow a checklist, DIY is perfectly reasonable at this level. Our Shopify store setup service includes tracking for new stores.
When professional setup is worth paying for
Professional help usually pays for itself in these situations:
- Your monthly Meta spend is meaningful, so even a small tracking gap affects real money.
- You run a custom website or checkout without a reliable native integration.
- You generate leads and need CRM stages sent back to Meta.
- You advertise on several platforms and want consistent server-side data across them.
- Reported results and real sales disagree and nobody can explain why.
- You are about to scale spend significantly.
Consider the economics. If you spend $10,000 a month on Meta and tracking problems make optimization even 10% less efficient, that is $1,000 a month in waste, every month. A proper setup costs a fraction of that once.

What professional setup typically costs
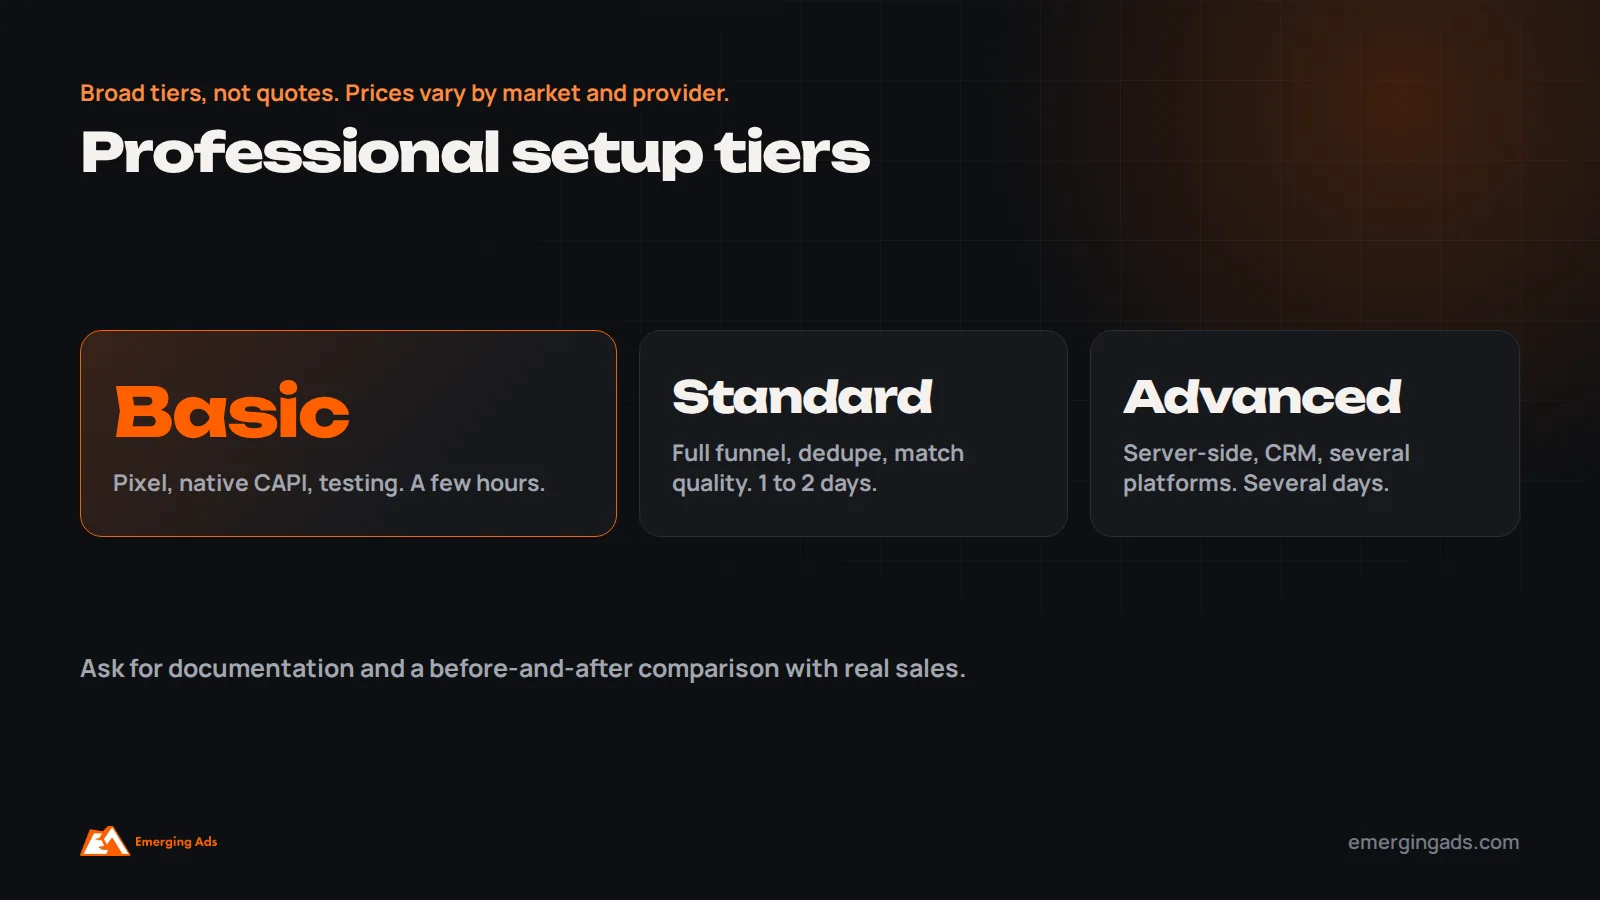
Prices vary by market, provider and complexity, so treat these as broad tiers rather than quotes:
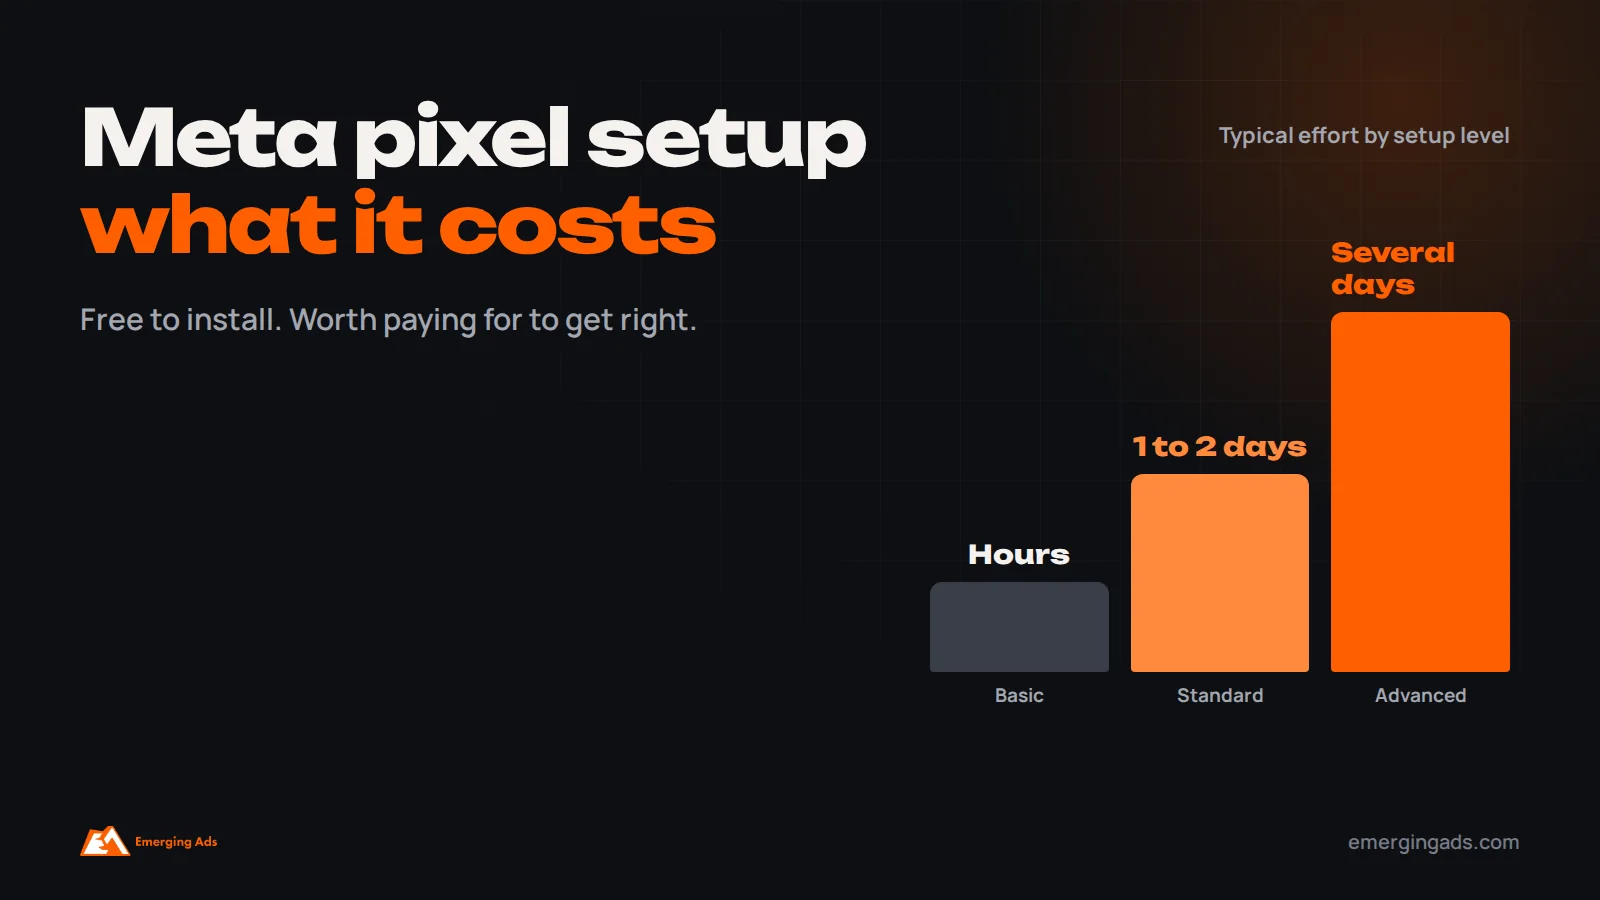
| Setup level | What it covers | Typical effort |
|---|---|---|
| Basic | Pixel and native Conversions API on a standard platform, testing | A few hours |
| Standard | Full funnel events, deduplication, match quality, domain verification, a tracking audit and a report comparing Meta with real sales | One to two days |
| Advanced | Server-side tagging, custom checkout or app, CRM offline conversions, multiple ad platforms | Several days, plus monthly server hosting |
Freelancers usually cost less per hour than agencies, while agencies typically include more testing, documentation and ongoing monitoring. Whoever you hire, ask exactly which of the five layers are included, how they will test, and what you will receive at the end, such as documentation of events and a before-and-after comparison.
Hidden and ongoing costs
- Server hosting for server-side tagging, typically a monthly fee that grows with traffic.
- Maintenance when themes, checkouts, apps or Meta’s requirements change. Tracking breaks more often than people expect, usually after a site update.
- Consent management for markets with privacy rules, such as the UK and EU, which affects what can be collected and how.
- Monitoring time, a monthly check that Meta numbers still roughly match real results.
None of these are large on their own, but they are easy to forget when comparing quotes. A setup that looks cheap upfront and breaks silently every few months is expensive in practice.
Budget a little time every month to check tracking health, and re-test after any significant website change.
What to do when tracking breaks
Tracking problems usually show up as a sudden change: purchases in Meta drop by half overnight while store orders hold steady, or Meta suddenly reports more purchases than you received. When that happens:
- Check Events Manager for new warnings and look at the event volume chart for the day it changed.
- Ask what changed on the site that day: a theme update, a new app, a checkout change, a new cookie banner.
- Use Test Events to walk through a purchase or lead and see which events fire.
- Check that the Conversions API connection is still active, since expired access tokens and disconnected apps are common causes.
- Pause major campaign changes until tracking is fixed, so you do not optimize based on broken data.
Most breakages are fixed within a day once found. The expensive part is the weeks they go unnoticed.
Tracking phone, in-store and offline sales
Some businesses close sales by phone, in a showroom or in person after an online enquiry. If those sales never reach Meta, campaigns are judged only on leads, and Meta cannot learn which leads actually buy. Meta supports offline events, sent through the Conversions API or uploads from your CRM or point of sale, which match sales back to ad interactions using hashed customer details. Setting this up takes more work, but for high-value services and businesses with physical locations it often transforms how well campaigns optimize.
Tracking for lead generation businesses
Lead generation tracking has an extra layer that ecommerce does not: what happens after the form. A lead is only valuable if it becomes a customer, and Meta cannot see that unless you tell it.
A strong lead generation setup sends a Lead event on genuine form submissions, or captures leads from Meta’s instant forms, then passes later stages, such as contacted, qualified, booked and won, back to Meta from your CRM. That lets Meta optimize for leads that become customers rather than leads that simply submit forms. It requires your CRM to store the identifiers needed for matching and an integration to send updates. Our article on CRM automation mistakes and our Meta lead generation service cover this in more depth.
Privacy, consent and compliance
Tracking is subject to privacy laws in many markets. In the UK and EU, you generally need consent before setting advertising cookies, and your consent banner should actually control whether the pixel fires. Data protection laws also apply in other markets, including India, the UAE and Saudi Arabia. Customer information sent through the Conversions API is hashed before transmission, but you still need a lawful basis and a clear privacy policy.
A proper setup respects consent choices rather than working around them. Ask anyone setting up your tracking how they handle consent in the markets you serve.
The most common setup mistakes
- Pixel installed twice, through the theme and an app.
- Conversions API not set up, or set up without deduplication.
- Purchase events without value or currency.
- Product IDs in events that do not match the catalog, which breaks dynamic ads.
- Lead events firing on thank-you page reloads or page views.
- No testing beyond “the app says connected”.
- Never comparing Meta results with real sales.
- Tracking broken by a site update and not noticed for weeks.
One setup for every ad platform
Most businesses do not only advertise on Meta. Google Ads, TikTok, Snapchat and Pinterest each have their own pixel and server-side API, and each needs the same events with the same values. Setting them up separately, with different plugins, often produces inconsistent data across platforms and slows the site with extra scripts.
For businesses on two or more platforms, a shared approach, such as a well-structured data layer feeding Google Tag Manager, or a server-side container that sends one clean event stream to every platform, usually costs more to set up but less to maintain, and makes cross-channel comparisons far more reliable. It also pairs naturally with analytics: our guide to attribution modeling costs explains how clean event data supports better measurement across channels.
Questions to ask before hiring someone
- Which events will you set up, and from which pages or actions?
- Will you set up the Conversions API, and how will you deduplicate?
- How will you improve event match quality?
- How will you test, and will you show me the results?
- How will you handle consent in my markets?
- What documentation will I receive?
- Who owns the accounts and containers afterwards? (It should be you.)
- What happens if tracking breaks after a site update?
A tracking health checklist
- One pixel, installed once.
- Conversions API active, with deduplication confirmed.
- Purchase or lead events fire once, with correct values and currency.
- Event match quality reviewed and improved where possible.
- Domain verified in Business Manager.
- Product IDs match the catalog.
- Consent banner connected to tracking where required.
- Meta results checked against real sales monthly.
If you want this done properly, tracking is part of every Meta ads engagement we take on, and we review it in every free ad audit. For ecommerce brands, our guide to Meta ads for ecommerce shows how tracking fits into the wider setup.
Frequently asked questions
How much does Meta pixel setup cost?
Basic installation through an official platform integration is usually free. A complete setup with the Conversions API, event mapping, deduplication and testing ranges from a few hours of work for a standard store to several days for custom or lead generation setups, plus server hosting if you use server-side tagging.
Do I need the Conversions API as well as the pixel?
For most advertisers, yes. The pixel alone misses a share of events because of browser and device privacy changes. The Conversions API recovers many of them, and with deduplication each event is counted once.
Can I set up the Meta pixel myself?
Yes, on standard platforms like Shopify, using the official integration and a careful testing process. Custom websites, lead funnels with CRM integration and multi-platform setups usually benefit from specialist help.
How long does Meta pixel setup take?
A basic platform setup takes under an hour. A thorough setup with the Conversions API, testing and checks against real sales takes a few hours to a couple of days, depending on complexity.
What is event match quality?
It is Meta’s score for how well your events can be matched to Meta users, based on the customer information sent with them. Higher match quality helps Meta attribute and optimize more of your conversions.
Why does Meta show more purchases than my store?
Common causes are duplicate events from the pixel and Conversions API without deduplication, pixel code installed twice, and attribution windows counting conversions differently from your store.
Is server-side tracking worth it?
For businesses with meaningful ad spend, several ad platforms or custom checkouts, usually yes. For a small store using a native Shopify integration, it is often unnecessary.
How often should I check my Meta tracking?
Check monthly against real sales, and re-test after any theme, checkout, app or website change, since updates often break tracking.